
WiFi

Once you've been notified that your internet is ready to go, set up your modem according to our setup guides.

Your iPrimus-supplied modem will have WiFi enabled by default, so follow these steps to connect:

  1. Enable WiFi on your device and search for nearby networks
  2. Select your WiFi network and connect


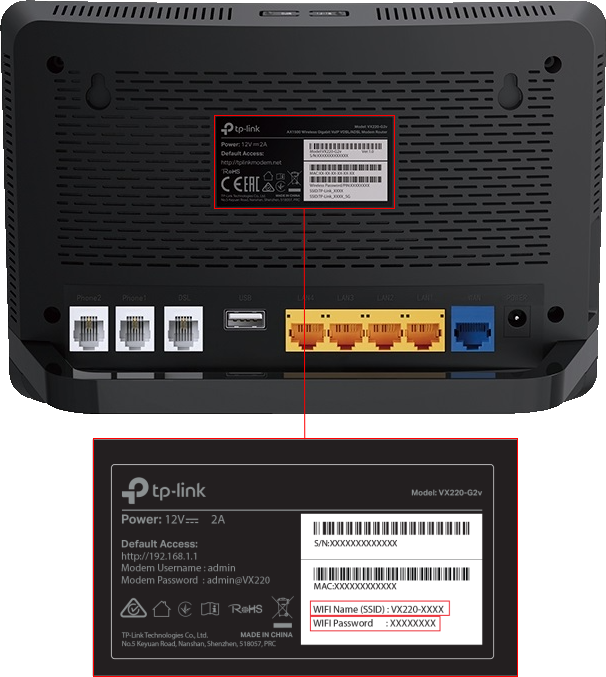
How do I know which network to join?

Your network details are on the label found on the back of your iPrimus-supplied modem:

WIFI Name (SSID) This is the name of the network you should join
WIFI Password This is the password you should enter when joining the network. Your computer or device may refer to it as a Network Security Key, WLAN key or similar


TP-Link VX220 WiFi Details


I'm still having issues

If you're having difficulties, check out these tips for connecting to your WiFi.

If you are connected to WiFi but can't use the internet, head here to troubleshoot your internet.

My network doesn't appear

Confirm your WiFi adapter is enabled
Windows 11
  • Go to the Start menu > Settings > Network & Internet
  • Under the Advanced network settings heading, click Change adapter options
  • If your Wi-Fi adapter is disabled, right-click and click Enable
Android Device
  • Go to the Settings app
  • Under the Wireless & Networks heading, toggle Wi-Fi to on
Mac OS
  • Click the Wi-Fi icon in the top-right corner of the Mac menu bar
  • Toggle Wi-Fi to on
iPhone
  • Go to the Settings app > Wi-Fi
  • Toggle Wi-Fi to on


Make sure your modem is turned on and WiFi is enabled

Plug your modem into the mains power and ensure it's switched on at the power point. After a few minutes the Wi-Fi (2.4G & 5G) lights should light up on the front of the modem.

iPrimus-supplied modems have WiFi enabled out of the box, however if the lights do not come on you may need to re-enable WiFi in the modem interface. Check out our advanced configuration page for your TP-Link VX220 modem. For other models, consult your modem's manual for further information.


Move closer to the modem

Although your modem may not be in the same room that you plan to use your computer from, try moving within 3 meters of it for the purposes of testing.

If your WiFi network is now visible, this means something is interfering with the signal between the modem and where you were trying to connect from. Check out our article for improving your WiFi signal.


I can see my network, but can't connect

Check your Network Name

The Network Name, also referred to as WiFi Name or SSID, will be printed on the back of your iPrimus-supplied modem next to the heading WiFi Name (SSID)

If you live in an apartment building you may see many Network Names that are similar to yours, so double-check you are connecting to the right one.


Password is not working

The default WiFi password will be printed on the back of your iPrimus-supplied modem next to the heading WiFi Password. If you have changed this from the default and have forgotten it, it will need to be reset inside your modem. Check out our advanced configuration page for your TP-Link VX220 modem. For other models, consult your modem's manual for further information.


Remove (forget) saved WiFi Networks

Many devices will save your WiFi network details so it can automatically connect next time you're close by. But occasionally the wrong details can get saved, and are difficult to overwrite. Remove the saved network details using these instructions.

Note: if you have an iPrimus-supplied TP-Link VX220 modem, the network name will start with "VX220". We recommend removing all networks with this prefix to start with.

Windows 11
  • Go to the Start menu > Settings > Network & Internet > Wi-Fi
  • Click Manage known networks
  • Click each network you wish to remove and click Forget
  • Try reconnecting to your WiFi network
Android Device
  • Go to the Settings app > Network & internet > Wi-Fi
  • Find each network you wish to remove and tap the Settings icon to the right
  • Tap Forget
  • Try reconnecting to your WiFi network
Mac OS
  • Click the Wi-Fi icon in the top-right corner of the Mac menu bar
  • Click Open Network Preferences…
  • Click Advanced… in the bottom right corner
  • On the Wi-Fi tab under the Preferred Networks heading, click each network you wish to remove and click the minus symbol
  • Try reconnecting to your WiFi network
iPhone
  • Go to the Settings app > Wi-Fi > Edit in the top right corner
  • Find each network you wish to remove and tap the minus icon to the left
  • Try reconnecting to your WiFi network

WiFi uses radio signals to communicate data between your device and your modem, and there are plenty of factors that can influence the quality of those radio signals. Here are some tips for achieving a fast and stable WiFi connection so you can make the most of your iPrimus internet.


Modem placement

WiFi radiates out from your modem in a shape similar to a donut, so ensure your modem is situated centrally in the household and ideally about 1 meter off the ground (a table or console is a good spot). If you have multiple stories in your house, bear in mind that due to this donut shape you may not get a great connection directly above or below the modem.


Obstructions

WiFi signals will have trouble travelling through solid objects, so avoid placing the modem near large metal objects such as fridges and other dense appliances. Thick walls and floors will also limit how far your WiFi travels, especially concrete.   

If you have a larger house and struggle with signal strength, try using the 2.4GHz frequency which is better at penetrating solid objects like walls, or consider purchasing a WiFi extender which can be connected to your existing WiFi network, and will broadcast the signal further.


WiFi modem placement


Sources of interference

Some devices such as baby monitors, microwaves and cordless phones use the same 2.4GHz frequency as some WiFi networks. Avoid placing these kinds of electrical devices between your modem and the device trying to utilise the WiFi.   

The 5GHz frequency is less susceptible to interference so if your device supports this frequency, try connecting to this. Learn more about the differences between 2.4Ghz and 5Ghz.

Modems use radio frequencies to transmit the internet to your WiFi-enabled devices such as laptops and mobile phones. These days there are two main frequencies used, and most modern devices should be compatible with them - but check with your device manufacturer to be sure!

The main difference between 2.4GHz and 5GHz is the speed and range. Here's a quick summary: 
 

 ProsCons
2.4GHzLarger coverage, better at penetrating solid objectsLower data throughput, more susceptible to interference
5GHzHigher data throughput, less susceptible to interferenceSmaller coverage (except 802.11ac), worse at penetrating solid objects


So which do I use?

2.4GHz is suited for travelling a longer distance at lower speeds. This is useful for connecting mobile devices that move between rooms in the house.

The one exception is the 802.11ac standard that allows 5GHz to reach almost the same distance as 2.4GHz (in ideal conditions). Current iPrimus modems support this, but be sure to check your computer or device for compatibility.

5GHz is suited for shorter distances at higher speeds so is perfect for high-bandwidth devices like TVs, gaming consoles and set top boxes, as well as video conferencing from a computer.


WiFi 2.4GHz vs 5GHz


How do I choose a frequency?

Using an iPrimus-supplied TP-Link VX220 modem

If you do not see a separate network for each frequency, check out our advanced configuration page for your TP-Link VX220 modem and follow the Configuring Band Steering instructions.


Using a different modem

Most modems will broadcast both frequencies at the same time, and differentiate them by putting "2.4GHz" or "5GHz" at the end of the network name. Consult your modem's manual for further information.